Research/Blog

AWS SageMaker is a fully managed end-to-end machine learning service that enables AI researchers and product developers to build, train and deploy machine learning models quickly and easily. AWS SageMaker does most of the heavy lifting in the process of deployment. Having said that, the process of deployment can be still be not so easy for novice ML beginners and may require some hand holding by experts. In order to reduce the knowledge gap we conducted a hands on webinar on “Practical Introduction to AWS SageMaker” on Sep-16. Through this webinar we hope to enable ML practitioners to take their ML model to next level and launch their first AI product.This is a practical guide for model deployment in AWS SageMaker.
Let’s get started.
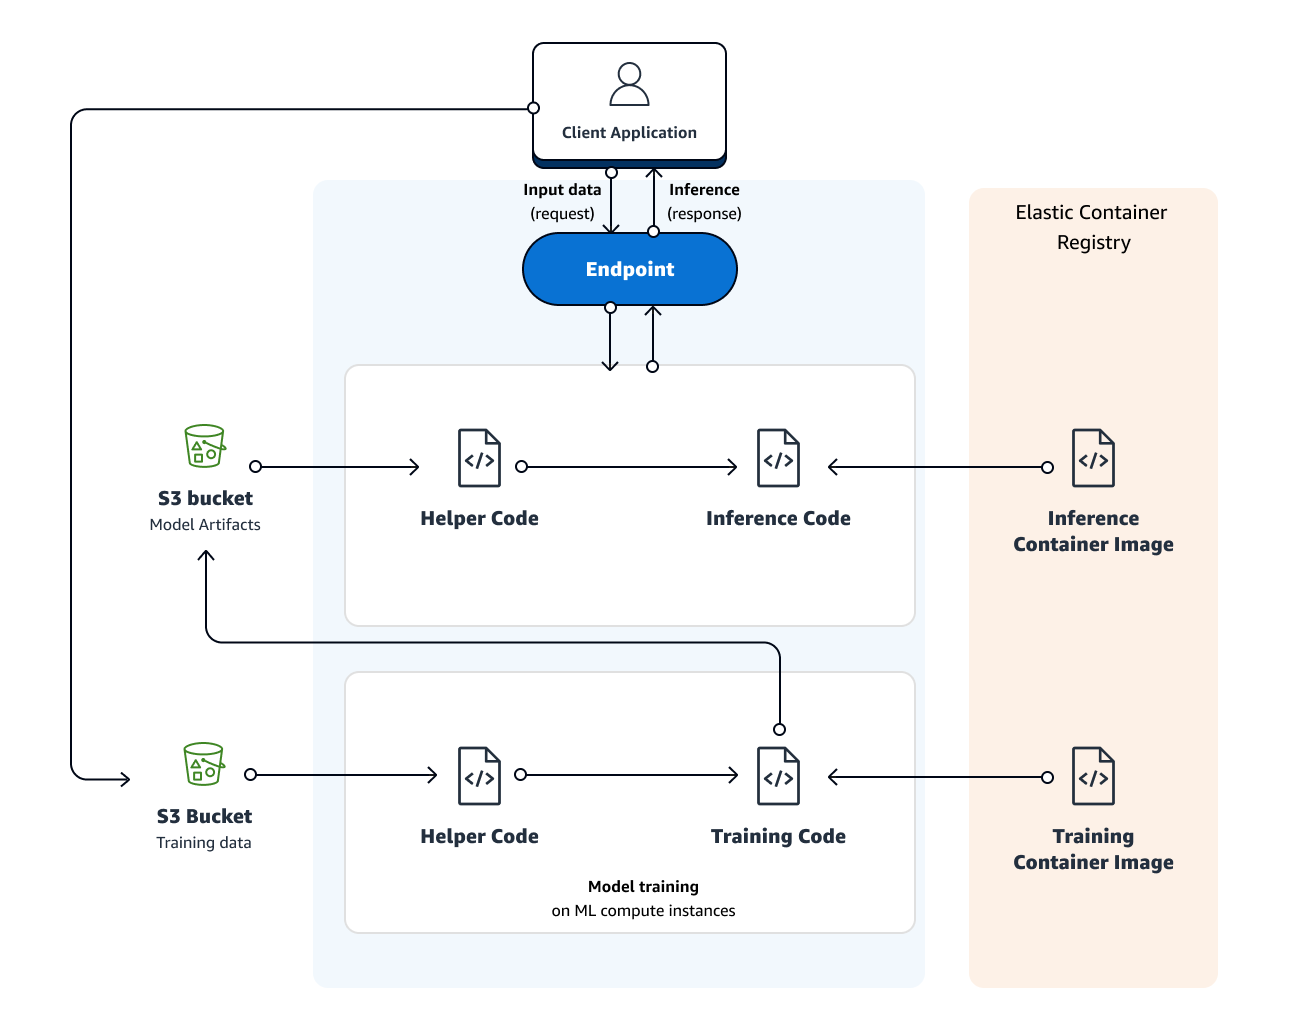
How it works?
The workflow of AWS SageMaker is shown in the figure below. It mainly consists of two components namely model training and model deployment. The model can be trained and deployed entirely in AWS SageMaker environment. Alternatively, it is also possible to bring your pre-trained model and deploy as endpoint. In this practical guide we will show you how to deploy a pre-trained model in AWS SageMaker.
Deployment of a pre-trained model
In this section, detailed steps of deploying a pre-trained model in AWS SageMaker are explained. Bringing a pre-trained model is cost effective as you can save some cost incurred in training the model in AWS SageMaker.
Steps of deploying a pre-trained model
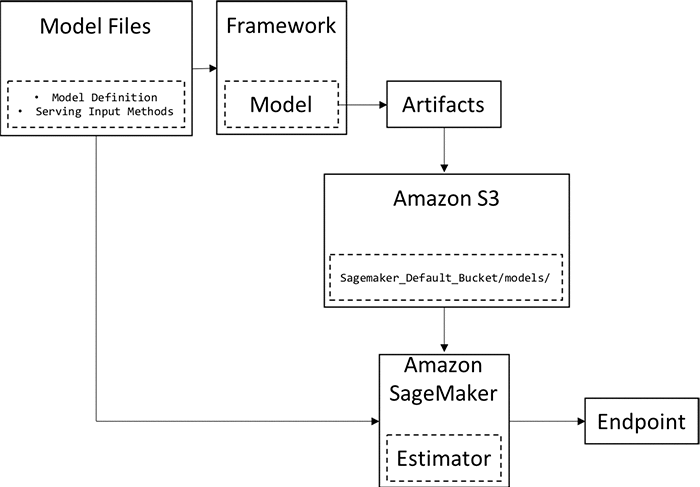
The workflow of model deployment is shown in figure below. In general, the model deployment contains the following steps,
- Model definitions are written in a framework of choice.
- The model is trained in that framework.
- The model is exported and model artifacts that can be understood by Amazon SageMaker are created.
- Model artifacts are uploaded to an Amazon S3 bucket.
- Using the model definitions, artifacts, and the Amazon SageMaker Python SDK, a SageMaker model is created.
- The SageMaker model is deployed as an endpoint.
Practical guide for deployment.
Create an endpoint
In this section we will first see how to deploy an endpoint using an example code from GitHub repo which we have created for this demo.
Step 1: Build and train the model in colab in your framework of choice. For this demo purpose, we will use PyTorch framework. The model and training code is provided as colab notebook in this GitHub repo.
https://github.com/bismillahkani/Practical-Introduction-To-AWS-SageMaker
Run the notebook. Save the model weights as shown below,

Step 2: Create AWS SageMaker notebook instance


Step 3: Open the jupyter notebook. Open a new terminal. Clone the demo code from GitHub repo using this link. https://github.com/bismillahkani/Practical-Introduction-To-AWS-SageMaker


Once successfully cloned you will see the following folders that has the demo code.

Step 4: Open the folder “cifar-pytorch-deploy”. Open the jupyter notebook “cifar-pytorch-deploy.ipynb”. Run All. An endpoint will be created.


Congratulation! You have deployed ML model as AWS SageMaker endpoint.
How to create inference script?
In this section, we will see how to create a inference script. The complete inference code is available in the folder “serve”. It has four files,
- model.py – this contains the model code i.e. your model architecture
- predict.py – this is the main file that do all the work
- utils.py – some utility functions
- requirements.txt – all the model dependencies should be provided here
SageMaker will look into the “predict.py” for the model loading and model serving. It has four main functions,
- model_fn
- input_fn
- output_fn
- predict_fn
The function name and signature has to followed strictly without modifications. Else, SageMaker does not understand what to do.
Model loading
The model is loaded using the model_fn

Model Serving
Once the model is successfully loaded, the model is served using three functions. input_fn takes the input in serialized format and deserialize to create input data for the prediction. predict_fn takes in the input data from input_fn and model from model_fn to do the prediction. output_fn takes the output data returned from predict_fn and serialize the output data.


SageMaker SDK
Once you have created the inference script as explained in previous section the model can be deployed using the SageMaker SDK by following the steps below,
Step 1: Create a SageMaker session

Step 2: Create model artifacts by taring the model.pth

Step 3: Upload the model artifacts to S3

Step 4: Create a SageMaker PyTorch model

Step 5: Create an endpoint

Step 6: After finishing your work, don’t forget to clean up.

That’s all. Now it’s time for you to practice.
Learning resources
Here are some learning resources that can be useful,
- https://docs.aws.amazon.com/sagemaker/latest/dg/how-it-works-mlconcepts.html
- https://docs.aws.amazon.com/sagemaker/latest/dg/how-it-works-training.html
- https://www.youtube.com/watch?v=uQc8Itd4UTs
- https://github.com/awslabs/amazon-sagemaker-examples
- https://aws.amazon.com/blogs/machine-learning/bring-your-own-pre-trained-mxnet-or-tensorflow-models-into-amazon-sagemaker/
- https://aws.amazon.com/getting-started/hands-on/build-train-deploy-machine-learning-model-sagemaker/
- https://sagemaker.readthedocs.io/en/stable/frameworks/pytorch/using_pytorch.htm
Well writen Kani.